Change default page transition with jQuery mobile

•September 9, 2013 • 2 Comments

jQuery mobile used to have the default page transition set to ‘slide’. But that has changed and the current version of jQuery mobile has the default page transition set to ‘fade’. While it is possible to specify a page transition (via hyperlink, for example) to ‘slide’ using the following html code:

<a href=”#page2″ data-transition=”slide”>

The is quite cumbersome if you want to have all the pages with the same transitions. So the best way to set all page transitions to be the same is to set it in the script tag at the header section of the page and set it before the jQuery mobile script is loaded. For example:

<link href=”jquery-mobile/jquery.mobile.theme-1.3.0.min.css” rel=”stylesheet” type=”text/css”/>
<link href=”jquery-mobile/jquery.mobile.structure-1.3.0.min.css” rel=”stylesheet” type=”text/css”/>
<script src=”jquery-mobile/jquery-1.8.3.min.js” type=”text/javascript”></script>
<script>
$(document).on(“mobileinit”, function(){
$.mobile.defaultPageTransition = ‘slide’;
$.mobile.page.prototype.options.addBackBtn = true;
});
</script>
<script src=”jquery-mobile/jquery.mobile-1.3.0.min.js” type=”text/javascript”></script>

The above code will also add a Back Button to every page.

Swipe Left and Right page transistion with jQuery Mobile

•September 6, 2013 • 29 Comments

I have been looking for a solution that simulates a reading experience with a jQuery mobile app, like reading an Adobe DPS folio. Naturally some javascript may be required. I did some search and found the following solution from this web page: http://designicu.com/jquery-mobile-swipe/

Specifically the code below is all I need:

<script>

$(‘div.ui-page’).live(“swipeleft”, function(){
var nextpage = $(this).next(‘div[data-role=”page”]’);
if (nextpage.length > 0) {
$.mobile.changePage(nextpage, “slide”, false, true);
}
});
$(‘div.ui-page’).live(“swiperight”, function(){
var prevpage = $(this).prev(‘div[data-role=”page”]’);
if (prevpage.length > 0) {
$.mobile.changePage(prevpage, {transition: “slide”,
reverse: true}, true, true);
}
});

< /script>

Give it a try, it really works.

From Flash to Windows 8 Metro App

•September 4, 2013 • 1 Comment

Publish Flash as Windows 8 Metro App? I have uploaded a video tutorial to Adobe Ed Exchange to show how:

http://edex.adobe.com/resource/bc912f/

Yes, the process does need extra help: CreateJS, PhoneGap and MS Visual Studio Express and of course a bit of JavaScript.

screenshot

Captivate 6.1 can publish Windows 8 Metro App

•February 18, 2013 • 3 Comments

Adobe has recently updated Captivate with some exciting new features:

https://blogs.adobe.com/captivate/2013/01/adobe-captivate-elearning-suite-subscription-has-its-advantages.html

http://helpx.adobe.com/content/help/en/captivate/using/whats-new-captivate-6-patch.html

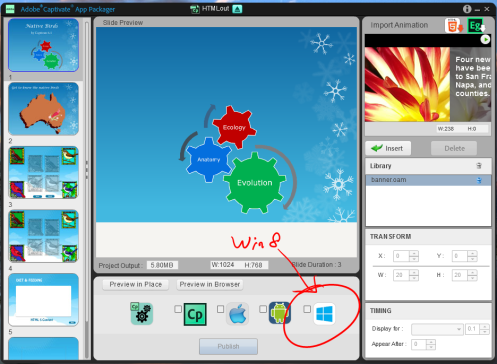
From there you can find links to lots of video tutorials on youtube to demonstrate many of these features. There is one feature though that didn’t get much air time. It is that the new Captivate App Packager can now publish an html5 based captivate project as Win 8 Metro app.

Capture

Alas, I couldn’t even find any documentation on how to setup the my laptop PC to do that. Fortunately, a Captivate engineer responded to my query and has given me the following detail steps:

1) Install “Windows 8 SDK “ which can be downloaded from : http://msdn.microsoft.com/en-us/windows/desktop/hh852363.aspx
a. After installation is complete , Add Windows 8 SDK path to the PATH environment variable if it is not there already .
b. For Example,  If the Windows 8 SDK is installed in the folder “C:\Program Files(x86)\Windows Kits\8.0” , you need to add “C:\Program Files (x86)\Windows Kits\8.0\bin\x86\” to the PATH environment variable.
2) Install Developer Certificate
a. Run PowerShell in administrator mode and run the command
“Show-WindowsDeveloperLicenseRegistration”.
b. A Microsoft ID is required for this step.
3) Run certCreator.exe with administrator privileges (certCreater.exe will be placed in “C:\Program Files\Common Files\Adobe\Adobe Captivate App Packager\CertCreator” for 64 bit and “C:\Program Files (x86)\Common Files\Adobe\Adobe Captivate App Packager\CertCreator” for 32 bit)
a. Enter a password and retype it to create a new password for private key.
b. Enter the password created in step 1 to create a public key.
c. Press ‘Y’ to add the certificate to Trusted root Publishers.
d. Enter password created in step 1 Again to create a client certificate.

If you follow these steps, you too should be able to publish Captivate project as Win 8 Metro App. Enjoy!

PhoneGap has added support for Windows 8 Metro

•December 10, 2012 • 1 Comment

Recently, PhoneGap has added support for Windows 8 Metro. Meaning you can use pretty much the same APIs you use when building app that runs on iOS, Android and Win 8 Metro:


http://docs.phonegap.com/en/2.2.0/guide_getting-started_windows-8_index.md.html#Getting%20Started%20with%20Windows%208

You would still need to get MS Visual Studio 2012 to test and deploy on your local machine. There is a free version of Visual Studio 2012 Express for Windows 8 you can download off Microsoft site. You would also get a free developer license in the process.

http://www.microsoft.com/visualstudio/eng/downloads#d-2012-express

I have tested out a responsive html5 app built with Dreamweaver CS6 and PhoneGap. Then run it in Visual Studio Express with a few extra lines of codes from a sample page and that was it. Surprisingly simple. The app then appears in the Win 8 Start Screen. Wow. That was my first Win 8 Metro app.


screenshot 

Using Native Extension with Flash CS6

•August 28, 2012 • 3 Comments

Most of the tutorials on using Native Extension have been about using it with Flash Builder 4.6. The fact is Flash CS6 has also added the capability of using Native Extension and it is just as easy. Here are a few simple steps for building an Android AIR app:

  1. Download a native extension of your choice from http://www.adobe.com/devnet/air/native-extensions-for-air.edu.html
  2. Add the ane file (com.adobe.extensions.Vibration.ane in this example) from the Advanced Actionscript 3.0 Settings Library Path Panel
  3. Select any necessary permission from the AIR for Android Settings. In this example Vibration was not available at Flash CS6 panel. So I added in the following code in the app descriptor xml file:
    <uses-permission android:name=”android.permission.VIBRATE”/>
    Once the code was added, the VIBRATION check box would appear in the Flash CS6 panel.
  4. Now to access the feature in the native extension, simply import the class file and write your AS code. Flash code editor would add in code hinting and code completion of the class file to help you write your code. In this example which is about accessing the vibration feature of the Android device, code may be like the following:
    import com.adobe.nativeExtensions.Vibration;
    var _vibrate:Vibration = new Vibration();
    _vibrate.vibrate(500);

So that’s all. Quite simple, isn’t it?

Photoshop Touch Pressure Sensitivity on Android tablet

•August 22, 2012 • 6 Comments

Adobe Photoshop Touch and Adobe Ideas both have pressure sensitivity feature on Android tablets. You would need an Android tablet that supports a pressure sensitive pens, like the Lenovo Thinkpad Tablet or the Samsung Galaxy Note. To turn on/off the pressure sensitivity of say the brush tool, you do that in the tool options settings:

Launching the camera from an AIR for Android app

•August 22, 2012 • 6 Comments

To access the smartphone camera from an AIR for Android app, you can try the following code. It would launch the camera and let use capture a photo. It then trace the photo name/path which you can use a loader object to load it onto the AIR app.

import flash.media.CameraUI;

import flash.events.MediaEvent;

import flash.media.MediaPromise;

import flash.media.MediaType;

var cam:CameraUI = new CameraUI();

cam.addEventListener(MediaEvent.COMPLETE, doComplete);

function doComplete(e:MediaEvent):void

{var mp:MediaPromise = e.data;  trace(mp.file.url);}

cam.launch(MediaType.IMAGE);

Loading external images into an AIR for Android app

•August 22, 2012 • 1 Comment

I have been building an Android AIR app that needs to load an image from the phone storage. After various trial and errors, I have the following actionscript code that would let user select an image from the phone and trace its name and path. From there simply use a loader object and you can attach the image to a movieclip.

import flash.filesystem.File;

import flash.net.FileFilter;

import flash.events.Event;

import flashx.textLayout.events.SelectionEvent;

var fileType:FileFilter = new FileFilter(“Image (*.jpg, *.png)”,”*.jpg; *.png”);

var fileChooser:File = File.userDirectory;

fileChooser.addEventListener(Event.SELECT, doSelect);

fileChooser.browseForOpen(“Open”, [fileType]);

function doSelect(e:Event):void

{trace(e.target.url); }

Screencast an Android phone/tablet onto a PC

•August 15, 2012 • 4 Comments

Quite often these days I would need to do a presentation from an Android phone or tablet and hence the need to project the device screen onto a data projector. One option is to bring along HDMI-VGA adapters. Another option is to connect the device to a PC (via USB or WiFi for example) and run some screen mirror software to mirror the device screen onto a PC screen. One such software which I came across recently is MyMobiler:

http://mymobiler.com/

I have been using it for sometime now with my Samsung Galaxy Note running ICS4.04 and it works very well so far. The mirrored screen refresh rate is a bit slow, about 1 fps I think. However the software is very capable. It even lets you use the PC mouse and keyboard to control the device. One important thing to note is that the devices needed to be rooted. Not a big challenge as I am reasonably tech savvy.

Image